

Overview
Microsoft SharePoint and the OneDrive system are the basis for a comprehensive file sharing system that GROVETECH can implement for your organisation. The entire suite consists of basic file cloud storage, file sharing, team sharing and teacher/student virtual classrooms.
In order to implement these technologies, core functionality will need to be installed and initially your organisation has requested a cloud-based replacement for USB drives for which the core SharePoint services are designed to deliver.
This document outlines the base USB replacement functionality for OneDrive person to person, this is not designed as a document sharing solution and should not be used as such as doing so may cause issues with file duplication.
To use shared files within a cloud structure please contact GROVETECH regarding any of the following product offerings:
- Basic file sharing within Microsoft SharePoint
- Advance file sharing using Microsoft Teams
- Virtual Classrooms using Microsoft Teams with virtual student assignments
Where a representative will be happy to give further details.
Procedure
Pre-requisites
Your computer must have the following specification in order to use OneDrive Cloud USB
- Windows 10 Fall Update or above
- 8GB Memory
- At least 20GB disk space free
- Your organisation subscribes to Microsoft Office 365 Enterprise/Education
If a previous installation of OneDrive is installed this will have to be converted for use, please make sure GROVETECH are aware of this.
Setting up OneDrive
Your computer will have already been updated with the latest version of OneDrive. To start setup, either double click the OneDrive icon on the desktop or from the Windows background task bar select the OneDrive icon.


- Type in your full email address then click the Sign in button.
- Type in your email password just as if you were signing in to your email account then click the Sign in button.
- A window will appear, read the information if you wish, then click the Next button.
- Click the right arrow button which will present you with a selection of information pages again, read these if you wish as they give further information regarding the use of OneDrive.
- Eventually, you will be presented with the “You’re All Set” window at this stage your OneDrive cloud USB is setup.

- Click on Open my OneDrive Folder to go to your USB drive.
Accessing files
All files are stored in the cloud and can be accessed from within the OneDrive USB folder as if they were local (on your computer). Any files that are in the cloud, display a cloud icon to the side of the file name. To edit the file simply double click it as you would normally do and the file will be downloaded and opened for editing and a green tick will be displayed to the side of the file.

Only files that are being edited are downloaded. Once you have edited and saved the file it will be automatically synced back up into the cloud and a copy will be kept on your computer for further editing if required. To delete a file simple delete it as normal, it will be automatically deleted from your OneDrive Cloud USB drive.
Accessing your OneDrive Cloud USB
You can access your OneDrive Cloud USB either locally or from within a browser. To access it locally either Double click the OneDrive icon on your desktop or click on the background processes icon on the task bar and click Open folder. To access your OneDrive Cloud USB via a browser, follow the instructions above but choose View online instead. Accessing the OneDrive Cloud USB via the Office 365 app will also display a list of the currently synchronised files, these will usually be the files you’ve recently added or edited.
Accessing your files from home
If you are at home and wish to work with files:
- From your OneDrive Cloud USB login to your email site at https://login.microsoftonline.com
- Select the OneDrive icon.
- If this is the first time you have accessed OneDrive Cloud it will take a moment to set things up, then say it’s ready.
- Click the continue button to access your OneDrive Cloud. To edit a file:
- Click the folder where your file is.
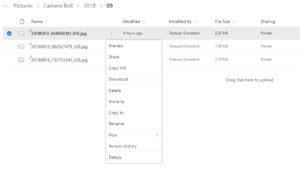
- When you get to your file click the 3 dots to the right of the file.
- Select Download from the menu that appears.
Save the file to any location on your computer then edit is as required. You will have to upload the file to replace the old one with this new.
To do this:
- Near the top of the OneDrive window select Upload.
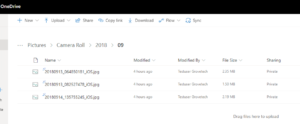
- Select Files.
- Go to the folder where you saved the file and select it and click open.
- You will get an error message to the right of the OneDrive Cloud windows asking you wish to replace the file.
- Click the replace button.
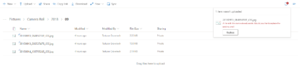
The updated file has now been loaded into your OneDrive Cloud USB and will sync into OneDrive on your PC when back at your place of work. Under the Modifies column the time should read a few seconds ago. You can also rename and delete files from this same menu and the changes will be reflected in your OneDrive on your PC.
Managing your storage
If you edit a large number of files and the space on your PC or laptop is running low, you can clear the OneDrive Cloud USB local cache without deleting files in your cloud storage, returning select or all files to cloud storage only. To do this:
- Go to your local OneDrive Cloud folder.
- Right click the folder if you want to return all files in the folder or go into the folder and right click the individual file.
- From the menu that appears select Clear space.
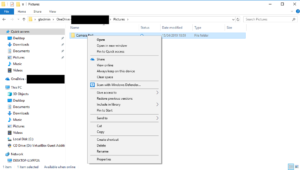
The green tick that was next to the file will now change to a cloud icon. The file has now been returned to the cloud and removed from local storage whilst retaining all edits made up to this point.
Files in use
Whilst a file is being edited directly from the OneDrive Cloud USB drive it will not be synced. Syncing will only complete once you have saved the file and closed the file or application. Please also remember to ensure that you do not open the file in another application. Likewise, if you are at home and intend to edit a file please make sure the file is not open on your PC at your place of work.
Last Update: June 29, 2020